
6.5.6 Deactivate Users |
In addition to removing users from groups, permissioned users can deactivate users, effectively preventing them from logging into the application from the Active Account Users page.
|
Note:
|
Both Active and Non-System users may be deactivated following the steps below.
|
To deactivate active users:
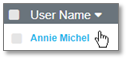
1. Navigate to the Active Account Users page, and click on the name for the appropriate user within the User Name column.
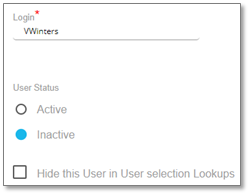
2. The user details page displays. At the bottom of the page, select Inactive in the User Status field.
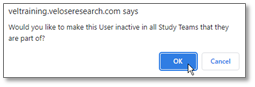
3. A notification displays, asking you to confirm user deactivation from ALL Study Team rosters. Click OK to proceed or click Cancel to deactivate the user in the system only.
|
Warning:
|
Clicking OK above deactivates a user from all Study Team rosters. To deactivate a user’s access to the system, but still allow a user to appear in a Study Team’s roster(s), click Cancel and then enter e-Signature and Submit.
|
4. Enter your e-Signature and click Submit to confirm.

The user is deactivated.
|
Note:
|
You may view and reactivate any deactivated users by searching the Deactivated users list on the Active Account Users page
|
To deactivate Non-System users:
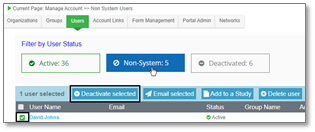
1. Check the User Name checkbox in the Non-System group and then click Deactivate selected.
2. Check the checkbox to make inactive in all Study Teams, if needed, then enter your e-Signature and click Confirm removal.
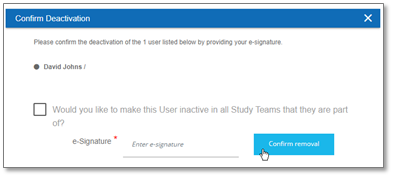
The user is now deativated and can be found in the Deactivated user group.